
All products are selected by our Beard Stylish editors. If you buy something through our links as an Amazon Associate we earn from qualifying purchases.
Thinning shears for beards — also called texturizing shears, blending shears, or thinning scissors — are specialized grooming tools designed with one serrated blade and one straight blade. As the blades close, the serrated teeth remove only a percentage of hair with each cut rather than cutting every strand. The result is natural-looking density reduction, seamless blending, and eliminated bulk without creating hard lines.
Unlike regular beard scissors that cut every hair they contact, thinning shears remove between 10% and 50% of hair per cut depending on tooth count. Tools with fewer teeth (7–9) remove more hair; tools with more teeth (28–36) remove less, offering finer control.
Why Use Thinning Shears on a Beard?
A full beard can become coarse, patchy-looking, and difficult to shape when bulk isn’t managed correctly. Standard scissors and beard trimmers create blunt edges and remove volume uniformly — the opposite of what thick, wiry facial hair needs.
Thinning shears solve several specific problems:
Bulk reduction without length loss. If your beard feels heavy or puffs outward at the cheeks or chin, thinning shears remove interior density while preserving your overall length and shape.
Blending neckline and cheek fade transitions. Harsh lines between your beard and skin are one of the most common grooming mistakes. Thinning scissors create soft, graduated transitions that mimic professional barbershop results.
Managing coarse or wiry beard texture. Coarse beard hair naturally grows in multiple directions, creating unruly volume. Regular texturizing with thinning shears trains the hair to lay flatter and appear more groomed.
Fixing uneven growth and patchy areas. Strategic thinning around denser zones makes sparse patches appear proportionally fuller by balancing the overall density distribution across your beard.
How to Choose the Right Thinning Shears for Your Beard
Tooth Count and Hair Removal Percentage
This is the most critical factor. Lower tooth count = more aggressive removal:
- 7–14 teeth: Heavy thinning, suited for very thick or coarse beards
- 15–28 teeth: Moderate blending, ideal for most beard types
- 28–40 teeth: Fine texturizing, best for detail work and soft transitions
Most men benefit from a 28–32 tooth thinning shear — aggressive enough to make a visible difference without creating gaps.
Blade Length
Beard thinning shears range from 5 to 7.5 inches. Shorter blades (5–5.5″) offer better maneuverability around the jawline, mustache, and under the chin. Longer blades (6.5–7.5″) suit men with longer, fuller beards where broad strokes are needed before detail work.
Blade Material
Japanese steel (440C or VG-10): High hardness rating, holds a sharp edge longer, reduces pulling on coarse beard hair. Premium choice.
German steel (Solingen): Slightly softer, easier to sharpen at home, more durable against drops. Reliable mid-range option.
Stainless steel (generic): Budget-friendly but dulls faster, increasing the risk of pulling rather than cutting cleanly.
Ergonomics and Handle Style
Offset handles position the thumb lower than the finger ring, reducing wrist tension during extended use. Crane-style handles offer an even more relaxed position. Both are preferable to classic symmetrical handles for home grooming sessions.
How to Use Thinning Shears on a Beard: Step-by-Step
What you need: Thinning shears, wide-tooth beard comb, boar bristle brush, beard oil, good lighting, handheld mirror.
Step 1 — Start with a clean, dry beard. Thinning shears perform more predictably on dry hair. Wash your beard, apply a small amount of beard oil, and brush it into your natural growth pattern.
Step 2 — Identify high-density zones. Common areas include the cheeks, the lower chin bulk, and the mustache corners. These are your primary targets.
Step 3 — Comb upward and cut into the lifted section. Lift a section of beard hair with your comb and make two or three cuts into the elevated portion — never at the skin level. This removes interior bulk while leaving surface hair intact.
Step 4 — Work in small sections. Take no more than a 1-inch wide section with each pass. After each cut, shake out the trimmed hairs and comb through before assessing density.
Step 5 — Blend neckline transitions. Hold thinning shears parallel to your neckline and make light, angled cuts working upward from the neck toward the beard. Use a feathering motion rather than full blade closures.
Step 6 — Check in multiple lighting conditions. Harsh overhead lighting masks unevenness. Check your results in natural daylight using both a front and side mirror angle.
Pro tip: Less is more. You can always remove more hair in a second pass — you cannot add it back. Cut, assess, then decide whether to continue.
Thinning Shears vs. Beard Trimmers: Which Is Better?
Both tools serve different purposes and the best groomed beards use both.
| Feature | Thinning Shears | Beard Trimmer |
|---|---|---|
| Bulk reduction | Excellent | Moderate |
| Blending transitions | Excellent | Poor |
| Length control | Limited | Excellent |
| Precision detail | High | Medium |
| Learning curve | Medium | Low |
| Risk of mistakes | Lower | Higher |
Use your trimmer first to establish length and shape, then finish with thinning shears to refine density, soften edges, and add texture.
Common Thinning Shear Mistakes to Avoid
Cutting too close to the skin. Thinning shears used directly against skin create bald patches that take weeks to grow back. Always cut at least 1–1.5 inches from the skin.
Using dull shears. Dull thinning scissors pull and bend hair rather than slicing cleanly, causing split ends and an uneven finish. Have shears professionally sharpened every 6–12 months.
Over-thinning one area. Repeated passes in the same spot compound quickly. Distribute your cuts evenly across the target zone.
Cutting wet beard hair. Wet hair appears longer and denser than it is when dry. Cutting wet leads to removing more than intended once the beard dries and contracts.
Maintenance and Care for Beard Thinning Shears
Quality thinning shears last 5–15 years with proper care:
- Oil the pivot point after every use with camellia or scissor oil
- Clean blades with a dry cloth after each session to prevent product and hair buildup
- Store in a protective case — blade tips are the most vulnerable point
- Never drop them — even a single drop on tile can knock a blade out of alignment
- Sharpen professionally rather than using at-home honing tools that can damage the serrated teeth on thinning blades
Frequently Asked Questions
How often should I use thinning shears on my beard? Every 3–4 weeks for most beard types. Very coarse or thick beards may benefit from thinning every 2–3 weeks. Over-thinning causes a sparse, wispy appearance that takes 6–8 weeks to recover fully.
Can I use hair thinning shears on my beard? Yes, but with caution. Thinning shears designed for scalp hair work on beards, though they’re often longer and harder to maneuver around facial contours. Beard-specific thinning shears are shorter (5–6″) and better suited to the curves of the jawline and chin.
Do thinning shears damage beard hair? Sharp, quality thinning shears do not damage hair. Dull shears create split ends and breakage. Always prioritize blade sharpness over price.
Will thinning shears help my beard look less patchy? Yes — by reducing density in thicker zones, thinning shears create a more even visual balance across the beard, making sparse areas appear less noticeable by comparison.
What’s the difference between thinning shears and texturizing shears? The terms are often used interchangeably, but technically thinning shears remove more bulk (fewer, wider teeth) while texturizing shears remove less and add movement (more, narrower teeth). For beard work, both function similarly — texturizing shears are simply more precise.
How much should I spend on beard thinning shears? For home use, $30–$80 buys a reliable pair in Japanese or German steel. Avoid anything under $20 — the blade tolerances are typically poor, causing pulling and uneven removal. Professional barber-grade thinning shears run $120–$400 and are worth the investment if you’re using them daily.
Can thinning shears thin out a mustache? Yes. Use small, fine-toothed thinning shears (30–35 teeth) for mustache work, making tiny, precise cuts above the lip line to reduce bulk without affecting mustache shape or length.
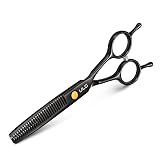
- ULTRA SHARP BLADES: Made of 100% Japanese stainless steel, the ULG hair thinning shears feature ultra sharp and durable blades for smooth cutting, perfect for all hair types and quality. Sharp blades slice through each hair strand cleanly in a single motion, rather than crushing or fraying it. This prevents the hair shaft from tearing or splitting at the tip
- BIGGER FINGER HOLES: Designed with bigger finger holes for both women and men, ULG texturizing shears are comfortable to hold and easy to maneuver for all haircut postures. Whether you are cutting, trimming, or styling, these 6.5” medium sized scissors will be your go-to choice from the haircutting tool kit
- ERGONOMIC DESIGN: Featuring a symmetrical shape and two finger rests, these thinning scissors are for right hand use. The built-in muffler reduces clicking noise and adds rebound for opening the blades for another cut. The blunt tips are safe for the skin, especially in hard-to-reach areas and for children