All products are selected by our Beard Stylish editors. If you buy something through our links as an Amazon Associate we earn from qualifying purchases.
Facial hair trimmers are among the most versatile grooming tools available, capable of handling everything from full beard sculpting to mustache detailing and stubble maintenance. Whether you’re a first-time buyer or looking to level up your technique, mastering your trimmer separates a polished look from a patchy mess.
What Is a Facial Hair Trimmer and How Does It Work?
A facial hair trimmer is an electric grooming device designed to cut and shape facial hair at adjustable lengths without the skin irritation associated with razors. Unlike clippers built for head hair, facial trimmers feature narrower blades optimized for contouring around the jaw, lip, cheeks, and neckline.
Most models operate on one of two mechanisms:
- Foil trimmers use an oscillating blade behind a thin perforated screen — ideal for close, flat trimming and edging
- Rotary/blade trimmers use exposed cutting teeth with adjustable guard combs, better suited for bulk length reduction and beard shaping
Understanding which type you own directly affects the technique you should use.
How to Use a Facial Hair Trimmer: Step-by-Step
Step 1: Start with a Clean, Dry Face
Always trim dry facial hair. Wet hair clumps together and appears longer than it actually is, which causes uneven cuts. Wash your face, pat dry, and allow hair to fully air out before switching on the trimmer.
Step 2: Choose the Right Guard Length
Guard combs attach to the trimmer head to control cutting length, typically measured in millimeters. Use this as a baseline reference:
| Look | Guard Length |
|---|---|
| Heavy stubble | 3–5mm |
| Short beard | 6–10mm |
| Medium beard | 10–20mm |
| Full length trim | 20mm+ |
If you’re unsure, always start longer — you can remove more hair, but you can’t add it back.
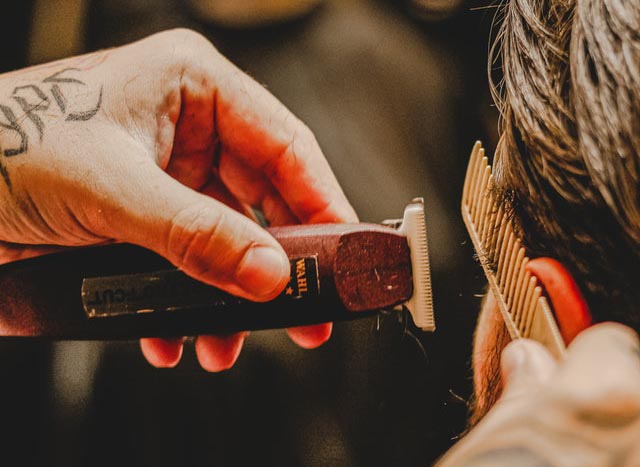
Step 3: Define Your Neckline First
The neckline is where most DIY grooming mistakes happen. Place two fingers above your Adam’s apple — that’s your natural neckline guide. Remove the guard or switch to a detail blade and trim everything below that line. Shave the neckline clean with a razor afterward for sharp definition.
Step 4: Trim Against the Grain for Even Length
Move the trimmer in the opposite direction of hair growth. For most men, this means moving upward on the cheeks and jawline, downward under the chin, and sideways across the upper lip. This lifts hair into the blade for consistent cutting contact and prevents the trimmer from skipping over flat-lying hairs.
Step 5: Shape the Cheek Line
A natural cheek line follows the curve from your sideburn to the corner of your mustache. For a groomed appearance without looking overly manicured, trim stray hairs above this line rather than dropping it lower. Dropping the cheek line too aggressively creates an unnatural, boxy appearance.
Step 6: Detail the Mustache
Switch to the narrowest guide or use the trimmer without a guard for precision mustache work. Comb the mustache downward, then trim along the upper lip edge to keep hair from overhanging your mouth. For a defined mustache outline, use the trimmer’s corner or tip to create a clean separation from the cheeks.
Step 7: Blend and Even Out
After your initial pass, remove the guard and use the trimmer’s corners to blend any harsh lines between different length zones. Beard blending — the gradual fade from longer chin hair to shorter cheek and sideburn hair — is what separates a styled beard from a rough, unfinished one.
Trimmer Maintenance: Extending Blade Life and Performance
A poorly maintained trimmer pulls hair rather than cutting it, causing skin irritation and uneven results.
After every use:
- Brush loose hair from between the blades using the cleaning brush included with most trimmers
- Tap the blade head lightly against a surface to dislodge trapped debris
Weekly (or every 3–4 uses):
- Remove the blade head and rinse under running water if the model is waterproof
- Apply one to two drops of clipper oil along the blade teeth to reduce friction and heat buildup
- Wipe down with a dry cloth
Every few months:
- Replace blade heads if trimming noticeably pulls or snags rather than cuts — most brands offer compatible replacement blades
Neglecting oiling alone can reduce a quality blade’s effective lifespan by half.
Common Facial Hair Trimmer Mistakes to Avoid
Rushing the process. Moving the trimmer too quickly skips over hair, creating patches. Use slow, deliberate strokes.
Skipping the guard. Trimming directly against skin without a guard on cheeks or the jawline often removes more than intended.
Ignoring blade direction. Trimming with the grain on bulk passes produces longer, less even results.
Trimming into a mirror with bad lighting. Shadows disguise unevenness. Use strong, direct lighting and a magnifying mirror for neckline and mustache detailing.
Letting the battery fully drain repeatedly. Lithium-ion trimmers last longer when you recharge before the battery drops below 20%.
Frequently Asked Questions
How often should I use a facial hair trimmer? For maintained stubble, trim every 2–3 days. For a shaped beard kept at consistent length, once a week is typically sufficient. Neckline cleanup can be done as often as needed, every 3–5 days for fast growers.
Can I use a facial hair trimmer on my head or body? Facial trimmers have narrower blades designed for detail work — they’ll work slowly and inefficiently on larger areas. Use a dedicated body or head clipper for those zones.
Do I need shaving cream with a trimmer? No. Trimmers are designed for dry use. Some waterproof models can be used with foam or gel in the shower, but it’s not required for performance.
Why does my trimmer pull hair instead of cutting it? The blade likely needs oiling, cleaning, or replacement. A dull or dirty blade loses its cutting edge and drags through hair rather than slicing it cleanly.
What’s the difference between a trimmer and a clipper? Clippers use wider blades for bulk hair removal across large areas (scalp, chest). Trimmers have narrower precision blades built for edging, detailing, and facial hair shaping at shorter lengths.
Should I trim before or after showering? Trim before showering. This lets you cut dry hair accurately and wash away loose clippings afterward. Post-shower trimming on slightly damp hair increases the risk of uneven cutting.
How do I fade my beard at home with a trimmer? Start with your longest desired length at the chin and cheeks. Drop one guard size as you move up toward the cheekbones and sideburns. Use the trimmer without a guard to fade the very top edge into the skin. Blend each length zone with the guard set between the two adjacent lengths.

- 13 attachments for all of your grooming needs: Full size steel trimmer, a steel precision trimmer, a nose and ear hair trimmer, 3 hair trimming guards, 3 beard trimming guards, a stubble guard, an accessory travel storage bag, and a cleaning brush. Unlike competition, no oil needed to maintain high quality performance Blades and Guards are easy to detach and rinse
- Maximum precision with DualCut technology, which includes 2x more self-sharpening blades. The steel blades sharpen themselves as they work, resulting in blades that remain as sharp as day 1 after 2 years of use.
- Unlike competition, no oil needed to maintain high quality performance. Automatic voltage: 100-240 V